Introduction
Many vending operators face a critical crossroads: customers arrive ready to pay, tap their phone or card, and nothing happens. Cash-only machines now miss 71% of all vending transactions, which were cashless in 2024. Installing a card reader on a vending machine addresses this directly — it's a retrofit most operators or service technicians can complete in under an hour on any MDB-compatible machine.
However, skipping compatibility checks or rushing cable connections leads to declined transactions, lost sales, and warranty issues. This guide covers the full installation process — from verifying MDB compatibility through running live test transactions — so operators can retrofit cashless payment correctly the first time and start recovering sales they're losing today.
Before You Install: Compatibility Checks and What You'll Need
Ordering hardware before confirming compatibility is the fastest way to waste a service call. Run through these checks first.
Prerequisites and Compatibility Checks
MDB Protocol Verification
MDB (Multi-Drop Bus) is the industry standard for vending machine peripherals. Most machines manufactured in the past 20 years support MDB Version 4.3, which allows card readers to communicate with the machine's controller. If your machine uses an older "Executive" protocol or proprietary single-price interface, it cannot accept a modern card reader without an MDB adapter kit first—adding cost and complexity to the project.
Before ordering hardware, verify:
- Power supply stability: The machine must deliver stable voltage to both the card reader and telemetry module (typically 12-42V DC)
- Physical mounting space: Front panel must have room in a customer-visible location near the coin slot or bill acceptor
- Cellular signal strength: Walk the installation site with a cell phone—weak signal means declined transactions regardless of hardware quality

If any condition fails, resolve it before proceeding. Operators replacing aging equipment entirely may find it simpler to start with a machine that has cashless payment built in — Daedalus Distribution's Vendekin lineup ships with factory-integrated card readers, skipping the retrofit entirely.
Tools and Components Required
What comes in the card reader kit:
- Card reader unit
- Mounting plate and protective bezel
- MDB cable (connects reader to machine controller)
- DEX cable (optional; required if you want inventory tracking via DEX port)
- Cellular antenna
- Drill template
Tools you'll need to bring:
- Drill and drill bits (check machine manual for correct size)
- Screwdriver (Phillips or flathead depending on machine)
- Cable ties for securing internal wiring
One rule that protects your controller board: Use only OEM-approved cables specified for your card reader model. Substituting cables or modifying pinouts can cause severe controller board damage.
How to Install a Card Reader on a Vending Machine: Step-by-Step
Installation follows a strict sequence. Each phase builds on the last—cutting corners between steps, especially around power and cabling, leads to failures that are difficult to trace once the machine is closed up.
Powering Down and Accessing the Machine
- Power off completely and disconnect the machine from its electrical source
- Open the machine door to access the interior control board and payment hardware
- Carefully loosen or reposition the bill validator to expose the cabling area—don't fully remove unless necessary
Mounting the Card Reader
Select the mounting position:
- Must be clearly visible to customers
- Position near coin slot or bill acceptor for intuitive user experience
- Avoid locations blocked by machine door swing or adjacent equipment
Mounting steps:
- Use the drill template included in your kit to mark pilot holes
- Drill holes carefully according to template specifications
- Pull the card reader cable through the main mounting hole before securing
- Attach mounting plate and bezel firmly to the panel—zero play or movement is essential to prevent long-term wear
Connecting the Cables
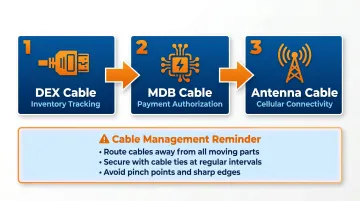
With the reader mounted, cable connections come next. Routing order matters—connect them in this sequence:
1. DEX Cable
- Connects to the machine's DEX port (if available)
- Enables inventory data tracking and sales reporting
- Optional but strongly recommended for fleet management
2. MDB Cable
- The critical data line that authorizes vends
- Connects machine payment controller to card reader or telemetry module
- If using a separate telemetry module, connect reader to module first, then module to machine MDB harness
3. Antenna Cable
- Can be mounted internally or routed externally for stronger signal
- External mounting is preferable in locations with marginal cellular coverage
- Secure cable to prevent movement or stress on connector
Cable Management:
- Route all cables away from moving parts (door hinges, product delivery mechanisms)
- Use cable ties to secure wiring neatly
- Avoid pinch points that develop when the door closes
Restoring Power and Configuring the System
- Reinstall the bill validator and reconnect its cables
- Restore power to the machine
- Allow 2-3 minutes for the card reader to boot and initialize
Configuration checklist:
- SIM activation (for cellular-connected readers)
- Network initialization and signal confirmation
- MDB protocol auto-detection
- Transaction parameters (accepted payment types, vend prices)
Most modern readers handle this automatically. If auto-detection stalls or the reader doesn't recognize the MDB protocol, consult your manufacturer's setup guide before proceeding.
Running Test Transactions
Before leaving the installation site, test every payment method:
- Chip card insert
- Contactless tap
- Apple Pay
- Google Pay
- Magstripe swipe (if supported)
For each test:
- Confirm the vend is delivered
- Verify the transaction appears in your management dashboard with correct amount and machine ID
- Check transaction speed—excessive delays indicate connectivity issues
If any payment method fails or the vend doesn't trigger, troubleshoot immediately. Do not consider installation complete until all payment methods work consistently.
Post-Installation Checks and Validation
Visual and Structural Inspection
- Reader mounting: Flush to panel with zero movement when pressed
- Cable routing: No pinch points near door hinges or moving mechanisms
- Antenna position: Maximum signal exposure (exterior mounting preferred for marginal locations)
Functional Validation Sequence
Run live payment tests:
- At least one transaction per supported payment method
- Verify tap-to-vend time is under 5 seconds
- Confirm transaction records appear in management platform with correct machine ID and amount
These tests matter more than they seem. A reader that powers on but isn't properly communicating over MDB appears fully functional until a real customer attempts a purchase. Catching MDB communication errors during installation prevents lost sales and customer complaints from the start.
Common Installation Problems and Fixes
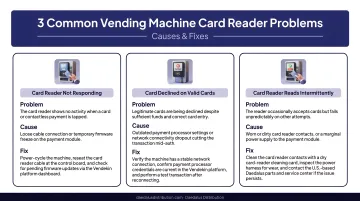
Card Reader Powers On But Vend Does Not Trigger
Symptoms: Reader accepts payment, display shows transaction complete, but machine doesn't dispense product.
Likely Causes:
- MDB cable connected incorrectly or to wrong port
- Protocol mismatch between reader and machine controller
- Machine requires MDB upgrade kit not yet installed
Fix: Power down completely, then:
- Re-check MDB cable seating on both the reader/telemetry module and the machine controller
- Confirm the cable is connected to the correct MDB harness
- If the machine uses Executive or single-price protocol, install the required adapter kit before proceeding
Transactions Consistently Declined or Timing Out
Symptoms: Reader processes but transactions fail or take excessively long to authorize.
Likely Causes:
- Weak or unstable cellular signal at installation location
- SIM card not properly activated
- Network initialization failed during setup
Fix: Start with signal and activation checks:
- Test cellular signal at the machine's exact location using a mobile device
- Move the antenna outside the cabinet or to a higher position inside
- Verify SIM activation status in the management platform and re-initialize the network connection
- If the reader supports Wi-Fi and the location consistently has poor cellular coverage, switch to a Wi-Fi connection instead
Card Reader Loses Connection or Goes Offline
Symptoms: Reader worked initially but drops offline intermittently or after a short period.
Likely Causes:
- Power instability from machine supply to reader
- Loose cable connection that shifts when door closes
- Antenna cable not properly secured
Fix: Work through connections and power in order:
- Check all cable connections with the machine door closed; normal operating vibration can loosen unsecured connectors over time
- Verify stable power supply to the reader using a multimeter if available
- Re-seat and secure the antenna cable so it can't shift during operation
Pro Tips for Installing a Card Reader Effectively
Test Signal Strength Before You Drill
Check cellular signal at the exact installation location before mounting anything. Repositioning an antenna or switching to Wi-Fi is far easier before the reader is secured. Walk the spot with a cell phone and note signal strength — if your phone struggles, so will the reader.
Photograph Everything During Installation
Take photos of cable routing and connections as you go. Future technicians — including yourself six months from now — will appreciate a visual reference of how the system was originally set up.
Use Your Specific Hardware Manual, Not a Generic Guide
Generic installation guides miss critical details. Cable labeling, MDB harness positions, and power requirements vary significantly between machine manufacturers and reader brands. Always use the official manual for your specific hardware combination.
Weigh Retrofitting Against Full Replacement
If your machine is aging or already requiring frequent repairs, adding a card reader may not be the best use of your budget. Newer machines like the Vendekin Omnivend Combo 10, Omnivend Combo 22, and Elevend Multivend 22 — available through Daedalus Distribution — come with cashless payment, touchscreen interfaces, and remote inventory tracking built in from the factory. For operators on the fence, it's worth running the numbers on both options before committing to a retrofit.
Frequently Asked Questions
How much does it cost to add a card reader to a vending machine?
Hardware costs typically range from $35-$399 depending on provider and features. Monthly service fees run $9.99-$18.95 per device. Transaction fees average 3.95% + $0.02 per transaction. Total cost varies by provider, contract length, and fleet size.
Can you add a card reader to any vending machine?
Most machines manufactured in the past 20 years support MDB protocol and can accept card reader retrofits. Older machines using Executive or single-price interfaces need an MDB adapter kit first, and very old machines may be better candidates for replacement than retrofit.
What card readers do vending machines use?
Leading U.S. providers include Nayax (VPOS Touch, Onyx), Cantaloupe (Engage series), and Crane NXT (4-in-1 Plus). All connect via MDB protocol and accept EMV chip cards, contactless payments, NFC, Apple Pay, and Google Pay.
How do I link a vending machine card reader to my bank account?
After installation and activation, log into your payment processor's portal and enter your business bank account ACH details under payment settings. Funds typically settle weekly, with deposits appearing 1-3 business days after the settlement date.
How long does it take to install a card reader on a vending machine?
For MDB-compatible machines with all components on hand, installation takes 30-60 minutes. Older machines requiring MDB adapter upgrades take longer and may require a trained technician for proper controller board integration and testing.