Key Takeaways
- Service mode lets you test dispensing, adjust pricing, run motor counts, fill coin tubes, and view error logs
- Entry method varies by brand: physical service buttons, keypad codes, or door-mounted switches
- Keep your owner's manual handy — incorrect settings can trigger "Out of Service" errors
- Exiting properly (saving settings and testing vend function) matters as much as entering correctly
- Incomplete motor counts after board replacement are the #1 cause of preventable "Out of Service" errors
How to Put a Vending Machine in Service Mode: Step-by-Step
Step 1: Power the Machine and Gather Your Documentation
Service mode cannot be accessed on an unpowered machine. Confirm the machine is plugged in and fully powered before proceeding.
Locate your owner's manual or control board documentation. Service mode entry codes and menu structures differ widely between brands and even between board versions. USI/Wittern machines use different procedures than Crane National or Dixie-Narco models, and GVC1 boards differ from GVC2 or Flex boards.
Note your machine's make, model, and control board type—these determine the correct entry method and menu structure.
Step 2: Locate the Service Mode Entry Point
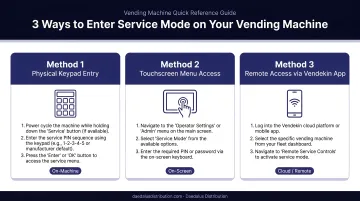
The three most common entry methods are:
Physical service mode button (USI/Wittern, AMS): Typically located inside the cabinet on the main control board, positioned on the left or right side panel. USI machines use a red button; AMS machines use a yellow switch on the lower right corner of the control board.
Keypad entry code (Crane National): Requires a 4-digit supervisor code entered within 6 seconds of pressing the Supervisor Key. The factory default is usually 0000, but this is model-specific.
Door-mounted switch or automatic entry (Automatic Products, Dixie-Narco): Some machines enter service mode automatically when you open the cabinet door (Automatic Products rev 21+), while others use a mode selection button on the back of the display module.
Step 3: Enter Service Mode
For button-entry machines: Open the front cabinet door and press the designated service mode button once. The display should shift from the customer-facing screen to the operator menu.
For touchscreen machines: A hidden tap sequence or a dedicated "Technician" or "Settings" icon (often accessed after entering a PIN) launches the service interface. Newer touchscreen machines, including the Vendekin models distributed by Daedalus Distribution, use cleaner operator interfaces than older keypad-based units, though you still need to know your machine's specific menu layout.
For keypad-code machines: Press the Supervisor Key, then enter the 4-digit code within 6 seconds. The display will show "ENTER CODE" first.
Confirm you've entered service mode by checking that the display shows operator menu options (such as "Motor Count," "Tube Fill," "Price Setting," or "Error Log") rather than the normal customer purchase screen.
Keep in mind: most machines disable payment acceptance while you're in service mode. Customers cannot complete purchases until you exit.
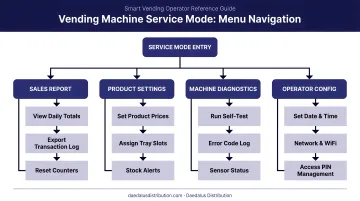
Step 4: Navigate the Service Mode Menu
Use the keypad numbers, physical buttons, or touchscreen to navigate to your desired function. Common menu options include:
- 1 – Tube Fill / Coin Initialization: Sets coin tube levels so the machine can make correct change
- 2 – Motor Count: Detects how many motors (product slots) the board recognizes
- 3 – Price Settings: Adjusts per-selection pricing across the machine
- 4 – Error/Alarm Log: Displays fault codes and recent operational alerts
Complete only the task needed. Avoid exploring unfamiliar sub-menus without documentation—accidental changes to coin mech calibration or temperature thresholds can trigger operational faults.
If running a motor count (essential after installing a new control board), select the motor count option and allow the machine to complete its scan. Note how many motors it detects and verify this matches your expected count.
Step 5: Exit Service Mode and Test Normal Operation
Exit using the method appropriate for your machine:
- Press the service button again
- Select "Exit" from the menu
- Close the cabinet door (on machines that use door-close as the exit trigger)
Do not exit by cutting power. Unsaved settings may be lost if the machine loses power before returning to its normal state.
After exiting, wait for the machine to return to its normal customer-facing display. Perform a test vend by inserting coins or a bill and making a selection. Confirm the machine dispenses correctly, accepts payment, and returns change if applicable.
If the display shows "Out of Service" after exiting, see the troubleshooting section below.
What You Can Do Once Inside Service Mode
Service mode is not just for emergencies—it's the control center for ongoing machine management. Knowing what's available here helps you stay ahead of problems rather than react to them.
Motor Count and Board Initialization
Motor count is the process where the machine scans and registers all active vend motors in each slot. According to VendNet's technical documentation, "motor count must be completed or the machine will stay in Out of Service."
This is critical after:
- Installing a new control board
- Adding or removing product rows
- Replacing motors or trays
A machine with an incomplete motor count will remain in "Out of Service" until this process runs successfully. The EFL8 error code specifically indicates incorrect motor count.
Coin Tube Fill and Payment Initialization
The Tube Fill function allows operators to load coins for change-making. The process varies by machine type:
Traditional tube systems (GVC1/GVC2 boards): The machine displays a target value (e.g., $1.00). Load coins through the front until you've added the required quantity—typically 30 each of nickels, dimes, quarters, and dollar coins for VendNet/Wittern machines.
Cassette-based systems (CPI Gryphon): These systems require a minimum of 3 coins per tube. Calibrate the empty cassette first, then load coins using one of four automated float methods: Float to Level, Float to Value, Auto-Float, or Snapshot Float.
Note that Dixie-Narco machines specify lower quantities: 6-8 nickels, 7-8 dimes, and 5-6 quarters.
Price and Product Configuration
Service mode typically allows you to:
- Set or adjust individual product prices per slot
- Update product descriptions on digital displays
- Enable or disable specific selections
- Configure pricing tiers or promotional pricing
Error Log and Diagnostic Review
Most machines log fault codes accessible in service mode. Operators can view recent errors (motor faults, temperature alarms, payment system failures) to diagnose recurring issues before they cause downtime.
Error codes are manufacturer-specific. While the Multi-Drop Bus (MDB) protocol is the NAMA-published industry communication standard that enables different devices to communicate with the vending machine controller, fault codes themselves remain proprietary. Cross-reference any logged codes against your manufacturer's fault code chart before assuming the cause of a recurring issue.
When Should You Use Vending Machine Service Mode?
Service mode is for specific operational and maintenance tasks — not a go-to fix every time something seems off.
Use service mode when:
- Installing or replacing a control board (motor count required)
- Initializing coin tubes on a new or reset machine
- Adjusting product pricing or configurations
- Investigating recurring error codes or "Out of Service" displays
- Performing test vends to verify dispensing after restocking
For the issues below, a quicker fix usually works just as well — no service mode needed.
Don't use service mode for:
- Minor software glitches—try a simple power cycle first (unplug for 3-5 minutes)
- Stuck products—manually check product alignment without entering service mode
- Basic cleaning or restocking tasks
What You Need Before Entering Service Mode
Before touching any service mode settings, make sure you have the following ready:
- Owner's manual or control board documentation — entry sequences vary between brands and board versions (GVC1, GVC2, Flex)
- Correct coin denominations — required if running coin tube initialization
- Product loaded in the relevant slots — needed if you plan to run a test vend
- Authorized operator present — changes to coin mech calibration, motor thresholds, or temperature settings can trigger faults if set incorrectly
Before making any changes, photograph the display or write down your current settings. That baseline makes it much easier to recover if something goes wrong.
Common Mistakes When Using Vending Machine Service Mode
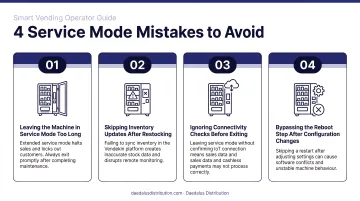
Most service mode errors come down to three things: insufficient preparation, rushed navigation, and improper exit procedures.
Skipping the motor count after board replacement: Operators often power up a new control board and wonder why the machine shows "Out of Service." The most common cause is an uncompleted motor count. The machine doesn't know how many vend motors it has until this process runs.
Exiting service mode incorrectly: Cutting power or closing the door before saving settings can corrupt configuration data. Always follow the exit procedure for your specific model — USI machines auto-exit after 25 seconds of inactivity, so work efficiently and save before stepping away.
Making changes without documenting current settings: Operators who adjust pricing, coin tube thresholds, or motor parameters without noting original values have no baseline to return to if the change causes problems.
Manually turning motors: The USI service manual specifically warns: "This vendor utilizes DC motors. Do not attempt to turn augers by hand. Motor damage could occur."
Troubleshooting: When Service Mode Isn't Working
Machine Won't Enter Service Mode / Button Press Has No Effect
The machine may be mid-cycle (processing a transaction or completing a motor operation), or the entry code isn't correct for that specific control board version.
To resolve this:
- Wait for any active motor cycles to complete before attempting entry
- Confirm the exact entry procedure in your owner's manual
- Verify you're pressing the service button — not the reset button
Machine Shows "Out of Service" After Exiting Service Mode
One of three things is usually responsible:
- Motor count was not completed before exiting
- Coin tubes have dropped below the minimum threshold for change-making
- The health and safety alarm has been triggered
According to FDA Food Code 2022 Section 3-501.16, time/temperature control for safety food must be held at 41°F (5°C) or below. Manufacturer thresholds vary from 41°F to 45°F, with alarms typically triggering when temperature exceeds the set point for more than 15 minutes.
Steps to clear the error:
- Re-enter service mode and run the motor count to completion
- Check coin tube levels and run a tube fill if they're low
- Open and close the machine door to reset a health and safety alarm, then trace the root cause (power outage, cooling failure)
Settings Changed in Service Mode Are Not Saving
This almost always means service mode was exited by cutting power rather than following the proper menu exit sequence. Less commonly, it points to a memory fault on the control board.
To fix it:
- Re-enter service mode, repeat your changes, and exit through the designated menu sequence
- If settings still won't save, contact the machine manufacturer's technical support — a control board replacement may be needed
Frequently Asked Questions
What is service mode on a vending machine?
Service mode is the operator-access interface built into vending machines that allows technicians and operators to configure settings, run diagnostics, test vend motors, set prices, and initialize coin tubes—separate from the customer-facing purchase interface.
How often do you need to service a vending machine?
VendSoft's preventive care checklist recommends visual checks each visit, monthly deep cleans, quarterly refrigeration inspections, and annual full-system calibration. Service mode itself is used for specific configuration or diagnostic tasks—not on a fixed schedule.
How do I exit service mode on a vending machine?
The exit method depends on machine type—most machines exit via a dedicated "Exit" menu option, pressing the service button again, or closing the cabinet door. Never cut power as the exit method, as this can cause you to lose unsaved settings.
Why does my vending machine say "Out of Service"?
The three most common causes are incomplete motor count (especially after board replacement), empty or insufficient coin tubes preventing change-making, and a triggered Health and Safety temperature alarm. Re-enter service mode to run motor count, verify coin tube levels, or reset the temperature alarm.
Is service mode the same as a factory reset?
No. Service mode is an operator configuration interface. A factory reset wipes all settings back to manufacturer defaults and is a separate, more drastic action typically reserved for persistent software faults.
Can using service mode incorrectly damage my vending machine?
Service mode is safe to enter, but incorrect changes to motor thresholds, coin mech calibration, or temperature settings can trigger faults or dispensing errors. Consult your owner's manual and document existing settings before making any changes.
Need expert support with your vending machine setup or service mode configuration? Daedalus Distribution offers U.S.-based parts, service, and technical support for smart vending machines. Contact us at +1 843-490-2804 or visit daedalusdistribution.com for comprehensive vending machine support and maintenance.